Measurement Systems Analysis (MSA) is a tool for analyzing the variation present in each type of inspection, measurement, and test equipment. It is the system used to assess the quality of the measurement system. In other words, it allows us to ensure that the variation in our measurement is minimal compared to the variation in our process.
Measurement is key in Six Sigma. Measurement System Analysis (MSA) is an experimental and mathematical method of determining how much variation within the measurement process contributes to overall process variability.
What are Measurement Data and Measurement Variation?
Measurement data is a collection of methods, tools, gauges, and operators used to obtain measurements.
Remember that DMAIC is a tool for removing defects from our process, especially by limiting variation. Moreover, that total observed variation comes in 2 flavors:
Total Variation = Process Variation + Measurement Variation
For example, let’s say you measure how many cups of M&M are in a production run. If you are measuring using a measuring cup that is not very accurate and your colleague uses an accurate device, you will have different measures. In this case, the accumulated variation between your two measuring cups is Measurement Variation.

Alternatively, imagine that a call center has auditors who review the quality of each phone associate’s call. If the phone associates are graded on that quality, impacting their paycheck, they would care very much about their scores. So, if every auditor graded to a different standard, there would be a lot of variation in that measurement technique, wouldn’t there be? This could certainly lead to a lot of unhappy associates.
How MSA Impacts the DMAIC Phases
- During the Measure phase not only do we have to collect data, but we also have to make sure that we are collecting the same data accurately and consistently.
- Creating visual tools like Pareto Charts is only as good as the measured DATA.
- In the Improve phase, you will require precise and accurate data to perform Designs of Experiments and also inform pilot plans.
- In the control phase, we use measurements to produce data to perform statistical process control and then prepare things like control charts to visualize if a process is in control or not.
- If our visual factory is based on data, then that specific control will only be as good as the underlying data.
Why Would We Perform Measurement Systems Analysis?
The main objective of Measurement Systems Analysis is to gauge the measuring system’s validity and minimize the leading process variation due to the measurement system.
- It gauges the quality of the measurement system or instrument.
- Organizations normally consider measurement data in making decisions regarding the process or business. Hence data should be accurate.
- Data accuracy is one of the fundamental requirements in the DMAIC process. It helps to evaluate the effect of the measurement system on the collected data. If the measurement system data is inaccurate, we will decide based on incorrect data.
- Monitoring and measuring resources is an important requirement in Quality management systems such as ISO 9001, AS9100, etc.
Fundamentals of Accurate Measurement System Analysis
Measurement System Analysis aims to qualify a measurement system for use by quantifying its accuracy, precision, and stability.
1-Measurement are said to be accurate if they tend to center around the actual value of the entity being measured. Measurement accuracy is attained when the measured value is slightly different from the actual value.
2-Measurement are precise if they differ from one another by a small amount.
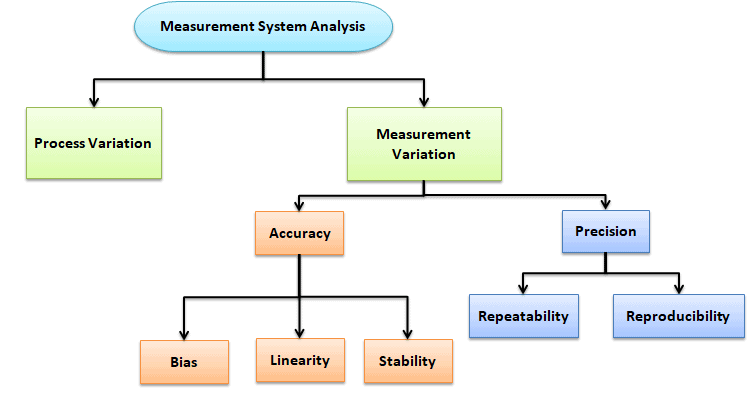
Accuracy
Accuracy is the difference between the true average and the observed average. If the average value differs from the true average, then the system is inaccurate. This is an indication of an inaccurate system.

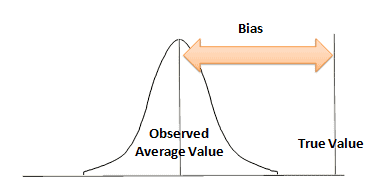
- Bias: Bias is the difference between the observed average measurement to the true or reference value. To measure the Bias, first, you need to measure the same part several times and then calculate the measurement average.
Simply Bias = Average of measurement value – Reference or true value.
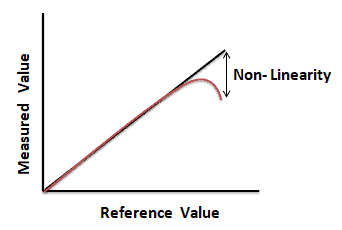
- Linearity: Linearity is the difference in Bias value in contrast to the normal operating range of the measuring instrument. In other words, it is the change in Bias over the operating range of the measurement equipment.
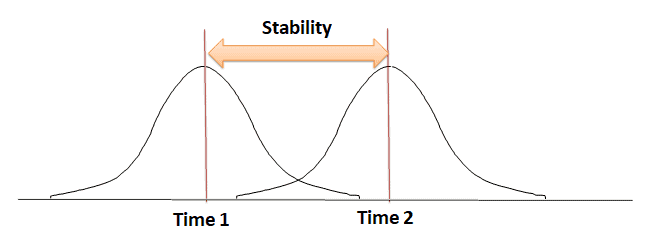
- Stability: Stability refers to the capacity of the measurement system to produce the same values over time when measuring the same sample. In other words, it is the difference in the average of at least two sets of measurements with a gauge over time. A measurement system is stable only if no special cause of variation affects the measurement system bias over time.
Precision
The precision of the measurement system is the degree to which repeated measurements show the same result when under unchanged conditions. In other words, precision refers to the closeness of two or more measurements to each other.

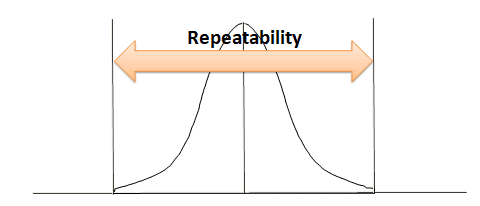
- Repeatability: Repeatability is the variation between successive measurements of the same part or characteristic by the same person using the same gauge. In other words, how much variation do we see in measurements taken by the same person, on the same part, using the same tool?
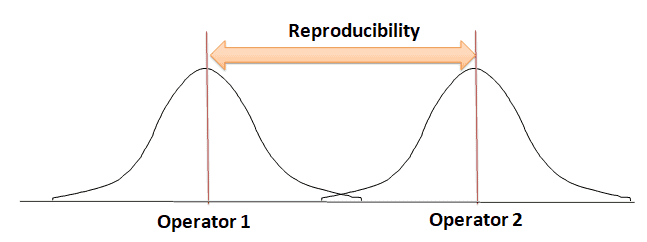
- Reproducibility: Reproducibility is the difference in the average of the measurements by different people using the same instrument when measuring the identical characteristics on the same part. In other words, how much variation do we see in measurements taken by different people on the same part using the same tool?
Also, see Gage Repeatability and Reproducibility

Calibration
Calibration is the process of comparing a measurement standard or an instrument with a known accuracy to another standard or instrument. We do this to detect or correlate any variation to perform adjustments to eliminate measurement error.
Calibration Interval
It must be based on stability, purpose, and degree of use.
Principles of Calibration
- Stability of measurement instrument
- Purpose of the measurement instrument
- How the environment interacts with the measurement instrument
Calibration Standards
Calibration compares instrument performance to standards of known accuracy; a standard is a physical representation of a unit of measurement. In other words, a known accurate measure of a physical quantity.
When a measurement of characteristics is made, the measured dimension is compared to a standard. It may be a yardstick and represents some conditions against which an object is compared obviously to a national or international standard.
Types of standard measurements are:
- In-house calibration lab or working level: Labs are set up within the organization itself to calibrate gages or instruments.
- Calibration standards: Professionals set up labs to calibrate the working level standards. Labs will generally be periodically sent to the national standard laboratories to calibrate their instruments.
- National standards: National standards laboratories are maintained by different parts of the world. These are absolute standards of high accuracy that can be used as ultimate reference standards. They provide certification to laboratories that maintain entire norms as per national standards.
- International standards: Maintained by the International Bureau of Weight and Measures” and are not available for ordinary users for the purpose of comparison or calibration.
The ultimate goal of industries is to provide quality products to customers. The product aims to not only fulfill the user’s requirement but also to have a specified dimension. Measurement of dimension is not always perfect and reliable unless measuring instruments are calibrated accurately. Thus, calibration plays a vital role in maintaining Quality.
Measurement Error
In Six Sigma, we want to base as much of our decisions on reliable data as possible. Measurement System Analysis uses techniques to understand the variation within measuring equipment.
For example, it is the variation brought into the equipment by people and by the environment. There are some useful methods for estimating how much error is due to gage and also by an individual.
Measurement Error is considered to be the difference between a value measured and the true value. It depends upon two things.
- What kind of instrument are you using
- Who is the person using the instrument
Therefore, whenever you use an instrument, keep your mind open to measurement error possibilities.
How Much Measurement Error is Acceptable in Measurement Systems Analysis?
According to AIAG (2002), a general rule of thumb for measurement system acceptability is:
- Under 10 percent error is satisfactory.
- 10 percent to 30 percent error suggests that the system is acceptable. Also, it depends on the application’s importance, the measurement device’s cost, repair cost, and other factors.
- Let’s consider that over 30 percent error is unacceptable. Hence, you should improve the measurement system.

The procedure of Measurement Systems Analysis (from here)
- Determine the type of data collection. Identify whether the data is continuous or discrete.
- Determine the number of appraisers, the number of sample parts, and the number of repeat readings.
- Larger numbers of parts and repeat readings give results with a higher confidence level. But also consider the time, cost, and disruption.
- Use appraisers who normally perform the measurement and who are familiar with the equipment and procedures.
- In particular, make sure they’re all the appraisers follow measurement procedures.
- Select the sample parts to represent the entire process spread. This is a very critical point.
- If applicable, mark the exact measurement location on each part to minimize the impact of within-part variation (e.g., out-of-round).
- Furthermore, ensure that the measurement device has adequate discrimination/resolution, as discussed in the Requirements section.
- Parts should be numbered, and the measurements should be taken in random order so that the appraisers do not know the number assigned to each part or any previous measurement value for that part. Also, a third party should record the measurements, the appraiser, the trial number, and the number for each part on a table.
Also, refer to Gage R&R for Gage Repeatability and Reproducibility calculations for both the Average and range and ANOVA methods.
Measurement Systems Analysis Videos
Six Sigma Green Belt Certification Measurement Systems Analysis Questions:
Question: As we calibrate our Measurement System to ensure accurate data, we frequently encounter Bias which is the __________________ of a measured value from the ________________ value. (Taken from Iassc sample Green Belt exam.)
(A) Spread, Mean of the population
(B) Deviation, hoped for
(C) Deviation, true
(D) Spread, ideal
Answer:
A: Gage variation. A measurement system analysis is to assess the statistical properties of gage variation. Also, Process performance and stability can be specified in other ways.


Comments (24)
yes very helpful
Glad it helped, Vijay!
GOod Study Material
Happy to help, Sanjay!
Good explanation
Thank you, Madhurant
Thank you.
You’re welcome, Bobby.
I am doing a catapult case study to identify factors that contribute to variability and distance a projected ball travels from the catapult. I want to do a Measurement Systems Analysis (MSA) using 2 operators each of which takes distance measurements. It is proposed to include this in a pilot test to determine the percent of variation in the process caused by the measurement system.
I have also considered having each operator measure the distance 2 ways one in inches and the other in centimeters. I am not sure how to set this approach up as a measurement analysis. Can you help?
Can you recommend any of these procedures. This is my 1st designed MSA. Thank you.
Hi Mary,
We clearly outlined the MSA process in https://sixsigmastudyguide.com/repeatability-and-reproducibility-rr/ article. I think the results remains same with the 2 ways one in inches and the other in centimeters.
Thanks
Hi Ted, should this be the landing page for the IAASC Black Belt link on Measurement System Analysis? Currently the landing page is the brief article Evaluating the Measurement Systems (EMP Studies). This article seems more appropriate.
Hi Alex,
Thanks for pointing that out. I’ll update the IASSC page with the link to the MSA and the EMP. We will have a more extensive EMP article published shortly, too.
Best, Ted.
what are the answers to the questions?
Which questions in particular, Isuru?
If you mean the ones at the end of the article, those are restricted to course members. You can sign up for immediate access here.
Best, Ted.
Question moved to member’s forum here.
Hi Tom,
Yes, its Bias. Updated the question pool. Thanks for your feedback.
Thanks
Hello, thank you for this valuable information. I have a question. For example, can I apply MSA if I have a visual control system(let’s say a visual control camera to say pass or fail according to visual inspection) in the production? Is this also a topic of attribute Gage R&R with only considering the repeatability since there is no operator in the system? How can I understand if this camera decides correctly according to the point of view of MSA?
Hi Yagmur,
Interesting question! I think it depends on a few additional factors;
Are false-positives and false-negatives being recorded by this system?
Best, Ted.
Hello,
I do the MSA for an instrument as soon as I receive it and the calibration is done periodically
Is it necessary to do again the MSA or once time is enough time? and please where can can i find the frequency requirement in MSA standards (AIAG/VDA5)?
Thank you in advance for your answer
Hello Mohamed,
As per AIAG, the frequency of measurement system analysis is determined by customer requirements and your company’s needs, based on product characteristics. The AIAG MSA manual is also a reference guide and does not specify any frequency.
Usually, the MSA study is conducted on any of the following events:
1) Changes/adjustments on appraisers and/or measurement tools
2) Calibration
3) Preventive Maintenance
4) Significant changes on the part being measured
Thanks
please template MSA type III
Thank you for your request regarding a Measurement System Analysis (MSA) Type III template. A Type III MSA study focuses on assessing the repeatability of a measurement system, typically in scenarios where operator influence is minimized or eliminated, such as automated measurement processes.
While SixSigmaStudyGuide.com provides comprehensive insights into MSA concepts, including repeatability and reproducibility, it does not currently offer a specific Type III MSA template. However, there are resources available that can assist you:
For a deeper understanding of MSA studies and their applications, you might find the following video tutorial helpful:
Measurement System Analysis (MSA) Part III: How to Perform GR&R
If you’re preparing for Six Sigma certification and wish to strengthen your grasp of MSA and related topics, consider exploring our courses:
These courses offer structured learning paths and resources to help you succeed in your certification journey.
Hi Ted This is a really helpful article on MSA, Can you provide examples with their calculations and result interpretation of each MSA type in excel sheet and by using Minitab.
Hi Karunesh,
That is something I would consider if / when I create a full teaching course product. As for now, we have detailed examples already.
Glad the article helped, though!