

In Design of Experiments, blocking involves recognizing uncontrolled factors in an experiment–for example, gender and age in a medical study–and ensuring as wide a spread as possible across these nuisance factors. Let’s take participant gender in a simple 3-factor experiment as an example. Blocking isn’t limited to gender, any nuisance variable you can’t control but suspect
might affect the result works the same way: which machine ran the trial, which shift, which raw material
lot, even which day of the week.
Why Blocking Matters
Without blocking, a nuisance variable can quietly confound your results. If all the trials using Factor
A at its high setting happened to run on Monday’s raw material lot, and all the low-setting trials ran on
Tuesday’s lot, you can no longer tell whether Factor A caused the difference you observed, or the lot did.
Blocking spreads the nuisance variable evenly across your actual factor combinations so it can’t hide inside
your results.
A non-medical way to see it: imagine testing two different bat designs to see which
produces more home runs, but you only test Bat A in a hot, high-altitude ballpark and Bat B in a cold,
sea-level one. Any difference you see could be the bat, or it could just be thin air carrying the ball
further. Blocking by ballpark, running both bats at both parks, keeps that nuisance variable from masquerading
as a real effect.
Blocking vs. Randomization Alone
Randomization already protects you against nuisance variables you don’t know about, by spreading unknown
influences randomly across your trials so they average out. Blocking is a step beyond that: it’s for a
nuisance variable you do know about and can measure in advance (gender, shift, machine, raw
material lot). Rather than hoping randomization happens to spread it evenly, you deliberately force an even
spread. Think of blocking as “controlled randomization” for the nuisance factors you can actually identify,
while plain randomization still handles everything you can’t.
Interpreting the Results
Once the experiment runs, you analyze it the same way you would any factorial design, with one addition:
the block itself (gender, in the example above) gets checked as its own term. If the block turns out to have
a real effect on the response, that’s useful information in its own right, not just a nuisance you
controlled for, it may be telling you the process genuinely behaves differently across that group. If the
block has no detectable effect, that’s also useful: it confirms the result holds regardless of that factor,
which makes your conclusion more broadly applicable.
Exam Tip
A common exam trap: a question describes a nuisance variable you can measure and control for in advance
(shift, machine, operator, lot) and asks for the best approach. If the answer choices include both
“randomize” and “block,” blocking is the stronger answer whenever that nuisance variable is already known
and measurable before the experiment starts. Randomization alone is the fallback for nuisance variables you
can’t identify or measure ahead of time.
When Not to Block
Blocking costs you degrees of freedom and adds complexity to the design and analysis, so it’s not free.
If a suspected nuisance variable turns out to have little real influence on the response, the added
complexity of blocking for it may not be worth the trade-off compared to simply randomizing and moving on.
Block for nuisance variables you have real reason to believe matter, not every variable you can think of.
Don’t Confuse Blocking with Confounding
These two terms get mixed up, but they’re opposites in a sense. Blocking is something you deliberately
design into the experiment to control a known nuisance variable. Confounding is an unintended problem, where
two variables’ effects can’t be separated because of how the experiment happened to be run. A well-designed
blocked experiment is one way to prevent a known nuisance variable from becoming an accidental confound.
Keep both terms straight for the exam: blocking is a design choice you make on purpose, confounding is a
design flaw you’re trying to avoid.
| Trial | Factor A | Factor B | Factor C |
|---|---|---|---|
| 1 | – | – | – |
| 2 | + | – | – |
| 3 | – | + | – |
| 4 | + | + | – |
| 5 | – | – | + |
| 6 | + | – | + |
| 7 | – | + | + |
| 8 | + | + | + |
The basic steps we need to follow in order to successfully block this factor in an experiment are:
- Determine how many trial blocks we need. The existing trials need to be divided by the number of levels in the uncontrolled factor. In the case of gender, this would generally be two ‘blocks’ of trials.
- Ensure proper distribution. It’s not enough to just distribute trials into blocks at random, or en masse – this can mess up our results. We can use a blocking scheme to figure out a good distribution pattern.
The standard blocking scheme for a 3-factor 2-level experiment looks like this: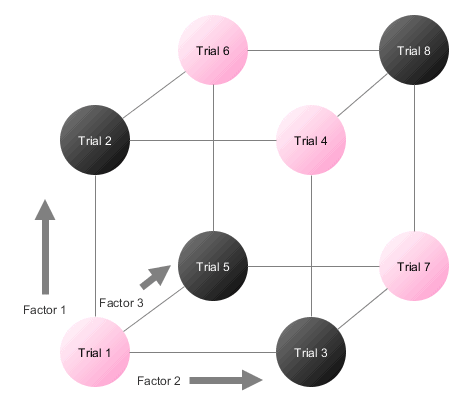
Design of Experiments: Blocking Dividing the trials this way–with each block assigned a different color–ensures that you get an even distribution across all factors, not just one or two.
- Design the experiment. Once you’ve assigned a color to a block, you can add blocking into your experiment design:
Trial Factor A Factor B Factor C Gender 1 – – – Male 2 + – – Female 3 – + – Female 4 + + – Male 5 – – + Female 6 + – + Male 7 – + + Male 8 + + + Female
